Hetzner offers a lot of storage space for very little money with its storage boxes.
In this guide I want to show you how to run oCIS (ownCloud Infinite Scale) on your own VM and store the data on a Hetzner Storage Box with S3.
Requirements
For this guide I use a Hetzner Cloudserver CPX11 (2 Cores, 2GB RAM, 40GB SSD) and a Hetzner Storage Box BX11 (1TB).
Of course, you can also use this tutorial with another provider and another server. I recommend you to use at least 2 cores and 2 GB RAM for your oCIS VPS.
Server Setup
We use a Debian 11 server in this tutorial.
Info
Docker must already be installed on your server. Here you can find instructions on how to install Docker on Debian or Ubuntu.
As a reverse proxy we use Traefik, if you don’t have Traefik installed yet, we will go into the setup below.
We will be running 3 Docker containers on our VM. Traefik, as our reverse proxy. Minio, as our S3 server and of course oCIS, to manage our data.
Traefik
Info
We will only provide the config files needed for a working Traefik installation in this guide. For more information I recommend you to have a look at the following Traefik v2 Install Guide.
For the beginning we create the following files and folders:
mkdir -p /opt/containers/traefik
mkdir -p /opt/containers/traefik/data
touch /opt/containers/traefik/docker-compose.yml
touch /opt/containers/traefik/data/acme_letsencrypt.json
chmod 600 /opt/containers/traefik/data/acme_letsencrypt.json
docker-compose for Traefik
Next we create our docker-compose.yml for a Default Traefik Setup. You can copy & paste the following snippet into your docker-compose.yml.
vim /opt/containers/traefik/docker-compose.yml
version: '3'
services:
  traefik:
    image: traefik:latest
    container_name: traefik
    restart: unless-stopped
    security_opt:
      - no-new-privileges:true
    networks:
      - proxy
    ports:
      - 80:80
      - 443:443
    volumes:
      - /etc/localtime:/etc/localtime:ro
      - /var/run/docker.sock:/var/run/docker.sock:ro
      - ./data/traefik.yml:/traefik.yml:ro
      - ./data/acme_letsencrypt.json:/acme_letsencrypt.json
      - ./data/dynamic_conf.yml:/dynamic_conf.yml
networks:
  proxy:
    external: true
traefik.yml
vim /opt/containers/traefik/data/traefik.yml
api:
  dashboard: false

certificatesResolvers:
  http:
    acme:
      email: "CHANGE-HERE"                  # put your own e-mail address
      storage: "acme_letsencrypt.json"
      httpChallenge:
        entryPoint: http

entryPoints:
  http:
    address: ":80"
    http:
      redirections:
        entryPoint:
          to: "https"
          scheme: "https"
  https:
    address: ":443"

global:
  checknewversion: true
  sendanonymoususage: false

providers:
  docker:
    endpoint: "unix:///var/run/docker.sock"
    exposedByDefault: false
    network: "proxy"
  file:
    filename: "./dynamic_conf.yml"
    watch: true
  providersThrottleDuration: 10
Remember to provide your own email address so that we can obtain a valid LetsEncrypt certificate for our oCIS setup.
dynamic_conf.yml
vim /opt/containers/traefik/data/dynamic_conf.yml
tls:
  options:
    default:
      minVersion: VersionTLS12
      cipherSuites:
        - TLS_ECDHE_RSA_WITH_AES_128_GCM_SHA256
        - TLS_ECDHE_RSA_WITH_AES_256_GCM_SHA384
        - TLS_ECDHE_RSA_WITH_CHACHA20_POLY1305
        - TLS_AES_128_GCM_SHA256
        - TLS_AES_256_GCM_SHA384
        - TLS_CHACHA20_POLY1305_SHA256
      curvePreferences:
        - CurveP521
        - CurveP384
      sniStrict: true
http:
  middlewares:
    default:
      chain:
        middlewares:
          - default-security-headers
          - gzip

    secHeaders:
      chain:
        middlewares:
          - default-security-headers
          - gzip

    default-security-headers:
      headers:
        browserXssFilter: true
        contentTypeNosniff: true
        forceSTSHeader: true
        frameDeny: true
        stsIncludeSubdomains: true
        stsPreload: true
        stsSeconds: 31536000
        customFrameOptionsValue: "SAMEORIGIN"
    gzip:
      compress: {}
Start Traefik Container
Now it is time to start Traefik:
docker compose -f /opt/containers/traefik/docker-compose.yml up -d
Wait a few seconds and then check with docker ps if Traefik is running, then you can continue with the minio Setup.
minio S3 Storage
Create the following folder and docker-compose.yml for minio:
mkdir -p /opt/containers/minio
touch /opt/containers/minio/docker-compose.yml
docker-compose for minio
vim /opt/containers/minio/docker-compose.yml
version: "3.7"
services:
  minio:
    image: minio/minio:latest
    networks:
      - ocis-net
    entrypoint:
      - /bin/sh
    command:
      [
        "-c",
        "mkdir -p /data/ocis-bucket && minio server --console-address ':9001' /data",
      ]
    volumes:
      - /mnt/storagebox/minio:/data
    environment:
      MINIO_ACCESS_KEY: CSSdwfXZfQXPNUX
      MINIO_SECRET_KEY: boouwrycNMGoS5T
    logging:
      driver: "local"
    restart: always
networks:
  ocis-net:
    external: true
Note
Make sure to replace MINIO_ACCESS_KEY and MINIO_SECRET_KEY with a random password (letters and numbers).
Dedicated docker network for oCIS
Then we need to create our ocis-net docker network:
docker network create ocis-net
Now, before we can start minio, we need to make sure that we have connected our storage box to our VM.
Mount Hetzner Storage Box on our Cloudserver
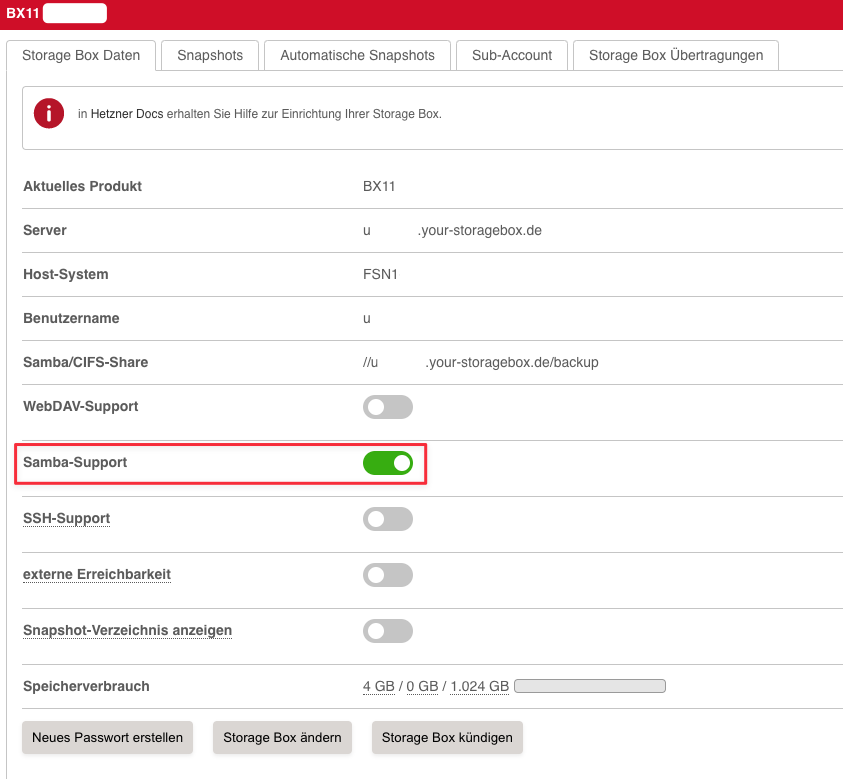
Make sure you have enabled Samba Support inside your Hetzner Robot, your Storage Box should look like this:

Next we will mount our Storage Box with CIFS to our VM.
Copy your Samba/CIFS-Share from your Hetzner Robot Site, eg. //<username>.your-storagebox.com/<share_name>.
Copy your Storage Share Password or set a new one with a click on „Neues Passwort erstellen“.
Try to mount your Storage Box
Now we are ready and can try to mount the storage box on our system.
apt-get install cifs-utils
mkdir -p /mnt/storagebox
mount.cifs -o user=<username>,pass=<password> //<username>.your-storagebox.de/backup /mnt/storagebox
You can use the following command to check if the disk has been mounted successful:
$ df -Th | grep storagebox

# the output should look like this:
//<username>.your-storagebox.de/backup cifs      1.0T  4.4G 1020G   1% /mnt/storagebox
Mount your Storage Box permanently
If all this worked for you and you can see your mount point with df, we can add this change to our /etc/fstab and thus mount the disk again on every reboot of the server completely automatically.
Create the following file:
vim /etc/storage-credentials.txt
Write your username and password, as used before in the mount command, in the following file:
username=u123456
password=password123XyZ
Open your fstab and add the following line to the end of the file:
vim /etc/fstab
//<username>.your-storagebox.de/backup /mnt/storagebox cifs iocharset=utf8,rw,credentials=/etc/storage-credentials.txt,uid=0,gid=0,file_mode=0644,dir_mode=0755 0 0
With mount -a you can now check if everything worked.
If you do not receive an error message, a mountpoint for your storage box will be created automatically the next time you reboot your server.
Start minio S3 server
Now you can start minio:
docker compose -f /opt/containers/minio/docker-compose.yml up -d
oCIS - ownCloud Infinite Scale
Info
We will only provide the config files needed for a working oCIS installation in this guide. For more information I recommend you to have a look at our in detail oCIS Docker Guide.
Create the following files and folders for oCIS:
mkdir -p /opt/containers/ocis
touch /opt/containers/ocis/docker-compose.yml
touch /opt/containers/ocis/.env
docker-compose for oCIS
vim /opt/containers/ocis/docker-compose.yml
version: "3.7"

services:
  ocis:
    image: owncloud/ocis:${OCIS_DOCKER_TAG:-latest}
    networks:
      - ocis-net
      - proxy
    entrypoint:
      - /bin/sh
    command: ["-c", "ocis init || true; ocis server"]
    environment:
      OCIS_URL: https://${OCIS_DOMAIN:-ocis.owncloud.test}
      OCIS_LOG_LEVEL: ${OCIS_LOG_LEVEL:-info}
      OCIS_LOG_COLOR: "${OCIS_LOG_COLOR:-false}"
      PROXY_TLS: "false" # do not use SSL between Traefik and oCIS
      OCIS_INSECURE: "${INSECURE:-false}"
      PROXY_ENABLE_BASIC_AUTH: "${PROXY_ENABLE_BASIC_AUTH:-false}"
      # admin user password
      IDM_ADMIN_PASSWORD: "${ADMIN_PASSWORD:-admin}" # this overrides the admin password from the configuration file
      # demo users
      IDM_CREATE_DEMO_USERS: "${DEMO_USERS:-false}"
      NOTIFICATIONS_SMTP_HOST: inbucket
      NOTIFICATIONS_SMTP_PORT: 2500
      NOTIFICATIONS_SMTP_SENDER: oCIS notifications <notifications@${OCIS_DOMAIN:-ocis.owncloud.test}>
      NOTIFICATIONS_SMTP_USERNAME: notifications@${OCIS_DOMAIN:-ocis.owncloud.test}
      NOTIFICATIONS_SMTP_INSECURE: true # the mail catcher uses self signed certificates
      # activate s3ng storage driver
      STORAGE_USERS_DRIVER: s3ng
      STORAGE_SYSTEM_DRIVER: ocis # keep system data on ocis storage since this are only small files atm
      # s3ng specific settings
      STORAGE_USERS_S3NG_ENDPOINT: http://minio:9000
      STORAGE_USERS_S3NG_REGION: default
      STORAGE_USERS_S3NG_ACCESS_KEY: <your-minio-access-key>
      STORAGE_USERS_S3NG_SECRET_KEY: <your-minio-secret-key>
      STORAGE_USERS_S3NG_BUCKET: ocis-bucket
    volumes:
      - ocis-config:/etc/ocis
      - ocis-data:/var/lib/ocis
    labels:
      - "traefik.enable=true"
      - "traefik.http.routers.ocis-ssl.entrypoints=https"
      - "traefik.http.routers.ocis-ssl.rule=Host(`ocis.example.com`)"
      - "traefik.http.routers.ocis-ssl.tls=true"
      - "traefik.http.routers.ocis-ssl.tls.certresolver=http"
      - "traefik.http.routers.ocis-ssl.middlewares=default@file"
      - "traefik.http.routers.ocis-ssl.service=ocis-ssl"
      - "traefik.http.services.ocis-ssl.loadbalancer.server.port=9200"
      - "traefik.docker.network=proxy"
    logging:
      driver: "local"
    restart: always

volumes:
  certs:
  ocis-config:
  ocis-data:

networks:
  ocis-net:
  proxy:
    external: true
You need to replace the following two values with the details from your minio docker-compose.yml at this point:
STORAGE_USERS_S3NG_ACCESS_KEY and STORAGE_USERS_S3NG_SECRET_KEY.
You also have to add your own domain to the traefik labels and replace ocis.example.com with your own.
- "traefik.http.routers.ocis-ssl.rule=Host(ocis.example.com)"
.env for oCIS
vim /opt/containers/ocis/.env
INSECURE=true
# oCIS version. Defaults to "latest"
OCIS_DOCKER_TAG=
# Domain of oCIS, where you can find the frontend. Defaults to "ocis.owncloud.test"
OCIS_DOMAIN=ocis.example.com
# oCIS admin user password. Defaults to "admin".
ADMIN_PASSWORD=
# The demo users should not be created on a production instance
# because their passwords are public. Defaults to "false".
DEMO_USERS=false
Make sure to replace OCIS_DOMAIN with your own Domain.
Start oCIS Container
We are almost done. Now you can start oCIS:
docker compose -f /opt/containers/ocis/docker-compose.yml up -d
Conclusion
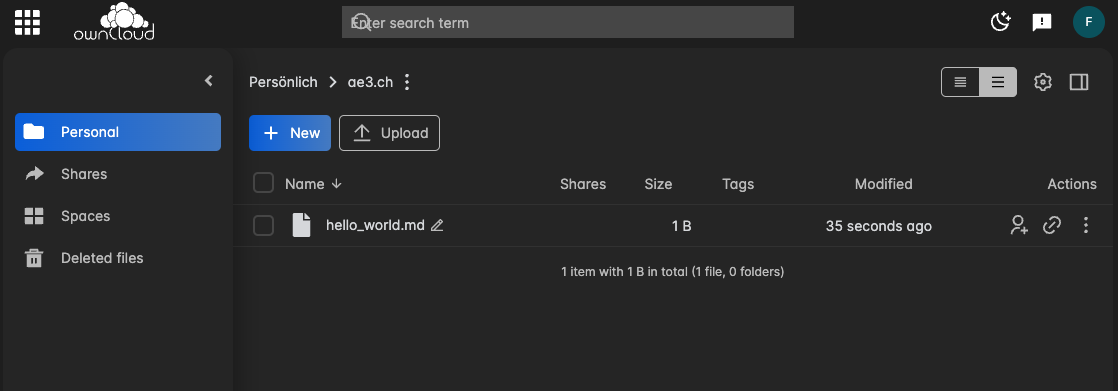
You can now access your oCIS domain and log in to your oCIS instance with admin:admin.

All data you upload to your instance will end up on your storage box via S3 connection.
A few metadata are still stored directly in a Docker container of your instance. However, this data is in the kilobyte range and should hardly require any storage space.
Have fun with your own oCIS instance. What do you use oCIS for and are you satisfied with your Storage Box? Feel free to leave me a comment with feedback or questions.